:focal(smart))
What’s New in Rattler-Build
While we are mostly known for our Pixi package manager, we aim to revolutionize the whole conda ecosystem. Our answer to package building is Rattler-Build. The goal of Rattler-Build is to be a drop-in replacement for conda-build with a lot of improvements. It is fast, and the error messages are great. Even though Jinja templating is integrated, the recipe v1 format remains valid YAML and can therefore be parsed by trivial Python scripts. Because of these advantages, conda-forge is in the process of migrating to recipe v1, the current progress can be tracked on Are we recipe v1 yet?.
In the past few months, we invested a lot of time to make rattler-build even more useful. Let us walk you through the various improvements!
Stricter Parser
Let's start with the annoying stuff. One thing we realized early was that we can still improve on our error messages. There were cases that were ambiguous and/or wrong, and Rattler-Build just guessed and ignored it.
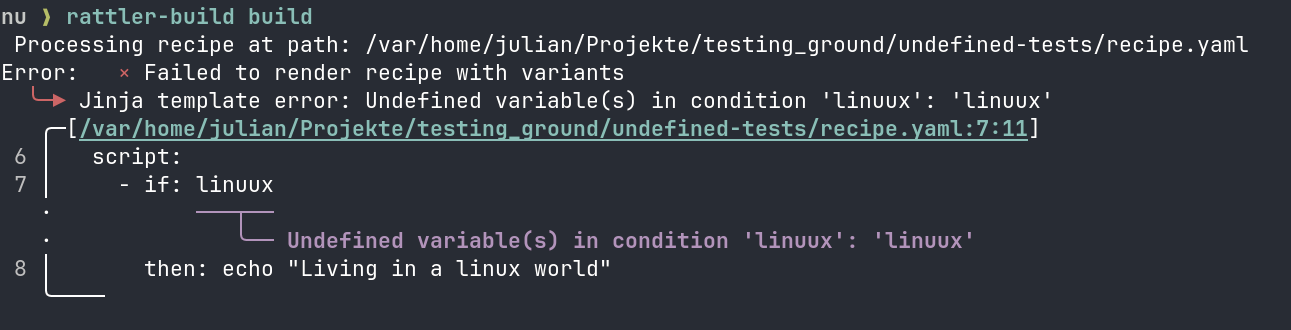
Let's check out this recipe for example.
package:
  name: test
  version: "1.0.0"

build:
  script:
    - if: linuux
      then: echo "Living in a linux world"
linux is a valid variable, but linuux isn't. With versions earlier than 0.58, Rattler-Build would have simply skipped the if-branch. Now, we get a clear error message like this one:
 rattler (the library Rattler-Build is based on) exposes the enum
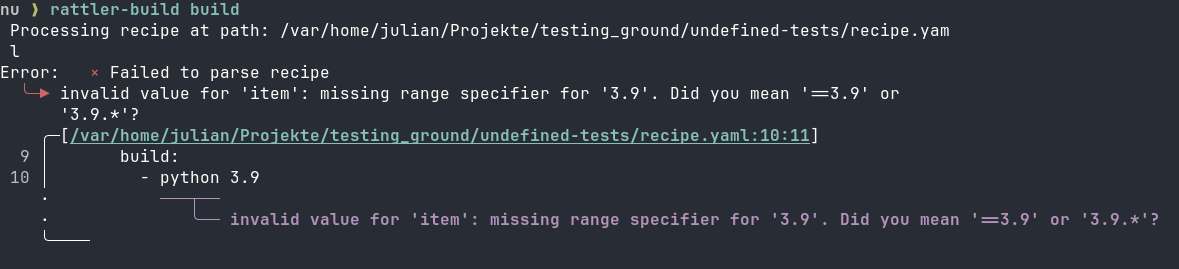
 ParseStrictness, which allows you to decide between Lenient and Strict. Early on, we decided on Strict so we don't guess the user's intent. However, we missed that in a few places, like in the test requirements:
package:
  name: test
  version: "1.0.0"


tests:
  - script: echo "from python 3.9"
    requirements:
      build:
        - python 3.9
If we run this now, we get the following error message:
 We consider both fixes to be pretty important. However, that also means that the newest version of Rattler-Build returns a parser error for recipes that used to build just fine. If you need any help with fixing your recipe, feel free to reach out to us on Discord.
Rust API
When building packages, sometimes you need more control than Rattler-Build gives you. While working on Pixi-Build, we ran into exactly that limitation. So we took the Rattler-Build application, extracted related functionality into library crates, and published them on crates.io. At the time of this writing we have:
This allows for use cases that would have been difficult to do with the Rattler-Build CLI. In this example, we use some of these crates to render a recipe and check how a variant file influences the host dependencies declared in a recipe.
use rattler_build_recipe::{
    RenderConfig, render_recipe_with_variant_config, stage0::parse_recipe_or_multi_from_source,
};
use rattler_build_variant_config::VariantConfig;

fn main() {
    let recipe = parse_recipe_or_multi_from_source(
        "
        package:
          name: example
          version: '0.1.0'
        requirements:
          host:
            - numpy ${{ numpy }}.*
    ",
    )
    .unwrap();

    let variants = VariantConfig::from_yaml_str("numpy: ['2.0', '2.1', '2.2']").unwrap();

    let rendered =
        render_recipe_with_variant_config(&recipe, &variants, RenderConfig::default()).unwrap();

    for v in &rendered {
        let host: Vec<_> = v
            .recipe
            .requirements
            .host
            .iter()
            .map(ToString::to_string)
            .collect();
        println!("numpy={} -> {}", v.variant[&"numpy".into()], host[0]);
    }
}
If we run this with cargo run, we get the following output:
numpy=2.0 -> numpy 2.0.*
numpy=2.1 -> numpy 2.1.*
numpy=2.2 -> numpy 2.2.*
Our variant file worked as expected. We got three packages which only differ in their NumPy version requirement.
Python API
While a Rust API is certainly useful, we expect that most people will want to consume our API from Python. With Python, it's easy to interactively work on things or automate tasks with scripts. That's why we worked on Python bindings for Rattler-Build with the explicit goal to be great for both humans and machines. But for now, let's just do the exact same thing again, but in Python.
# render_variants.py
from rattler_build import Stage0Recipe, VariantConfig

recipe = Stage0Recipe.from_yaml("""
package:
  name: example
  version: "0.1.0"
requirements:
  host:
    - numpy ${{ numpy }}.*
""")

variants = VariantConfig({"numpy": ["2.0", "2.1", "2.2"]})

for v in recipe.render(variants):
    print(f"numpy={v.variant['numpy']} -> {v.recipe.requirements.host[0]}")
If we run python render_variants.py, we get the same output as with the Rust version:
numpy=2.0 -> numpy 2.0.*
numpy=2.1 -> numpy 2.1.*
numpy=2.2 -> numpy 2.2.*
Package Assembly
We also added functionality that we haven't exposed yet to the CLI. Take for example assemble_package: Sometimes you only want to create a conda package out of files, no build step required. This API allows you to do exactly that:
# Create temporary directories for our example
work_dir = Path(tempfile.mkdtemp())
files_dir = work_dir / "files"
output_dir = work_dir / "output"
files_dir.mkdir()
output_dir.mkdir()

# Create some example files to package
(files_dir / "bin").mkdir()
(files_dir / "bin" / "hello").write_text("#!/bin/bash\necho 'Hello, World!'")

# Create the package
output = assemble_package(
    name="hello",
    version="1.0.0",
    target_platform="linux-64",
    build_string="0",
    output_dir=output_dir,
    files_dir=files_dir,
)

print(f"Package created: {output.path.name}")
print(f"Identifier: {output.identifier}")
You can get py-rattler-build from both conda-forge and PyPI. On our website, we additionally provide a reference and tutorials.
Playground
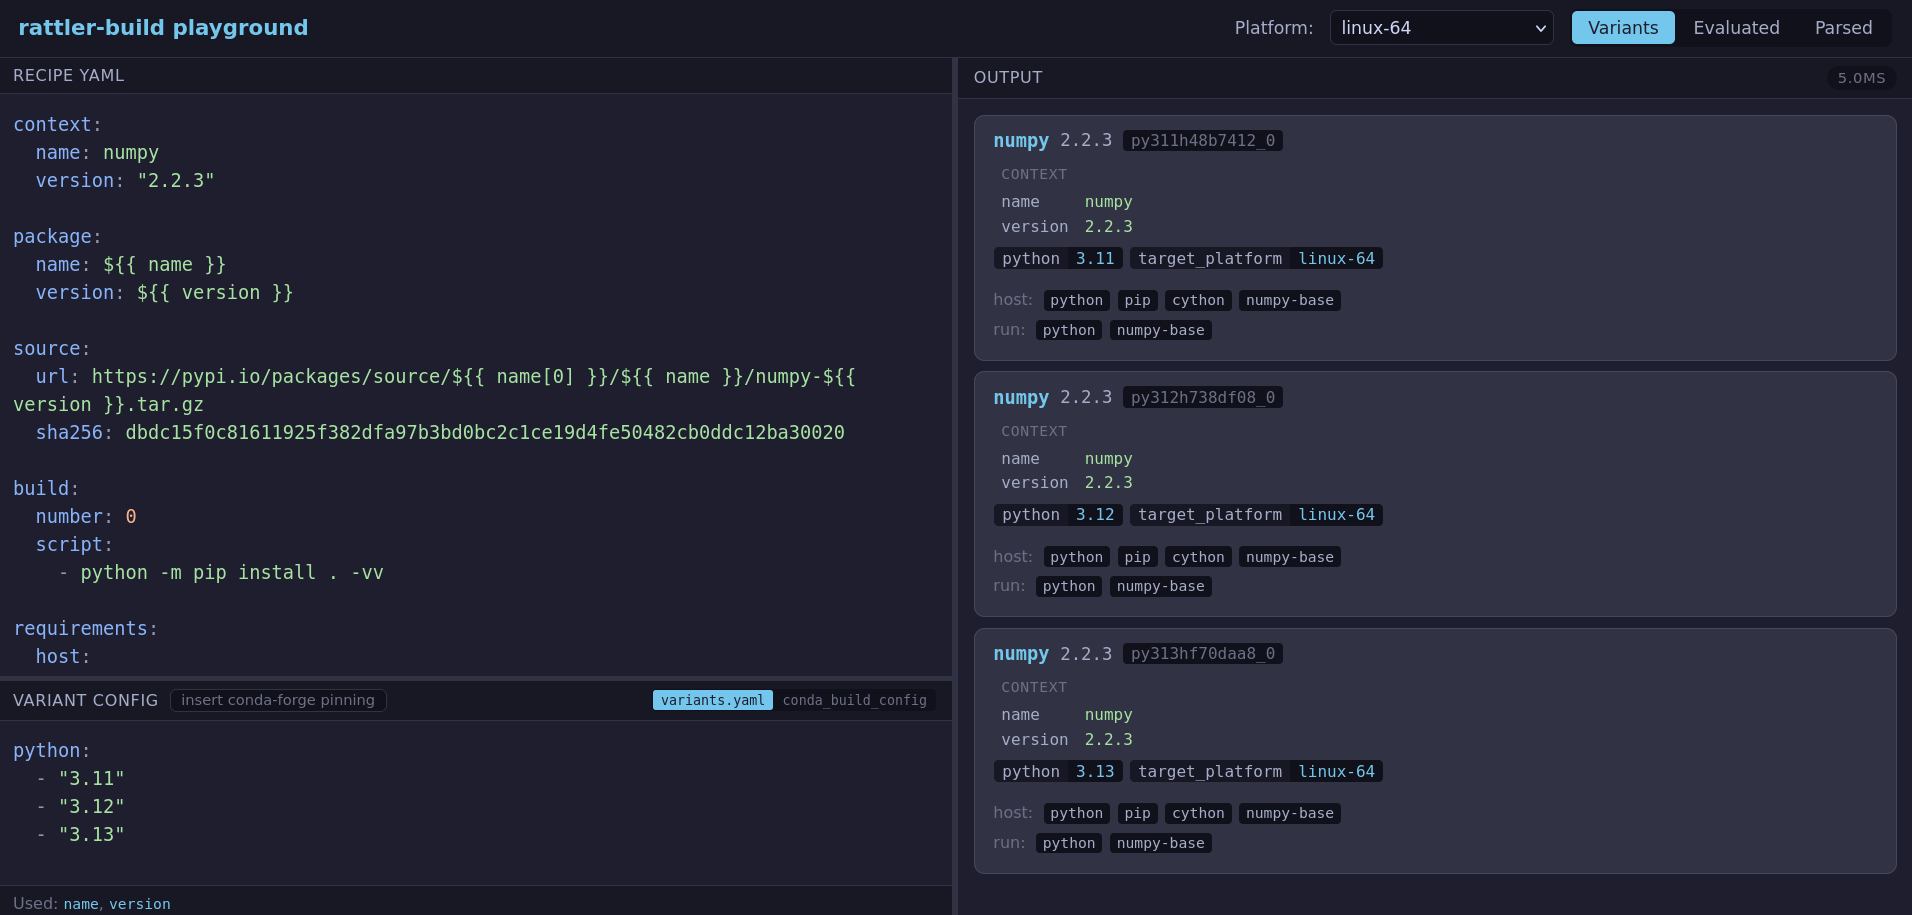
And the fact that Rattler-Build is written in Rust keeps on giving! Not only is it much easier to write Python bindings that way (thank you maturin), it also makes it pretty doable to compile it to web assembly. One thing we wanted for a long time was an online playground, where you could easily check how a recipe renders and into which packages it results in. So we made exactly that! You can go to playground.rattler.build and experiment with your favorite recipe. Since everything is running locally, no data is leaving your machine.
Debug Shell
Another thing we wanted to improve with Rattler-Build is the debugging experience. What wee did before was to write a first iteration of a recipe and execute rattler-build build. If there was an error we fixed it, and then ran rattler-build build again. But if we only modified the build script, then the second call did too much work, there's no need to solve install the build and host environment all over again. If the build script failed somewhere in the end, it would start all over again.
We are happy to report that this is much easier now with rattler-build debug. The workflow goes like this:
# 1. Enter the failed build environment
# Rattler-build uses the metadata from the failed build to set this up
rattler-build shell

# 2. (Optional) Inject missing dependencies to test fixes
rattler-build debug build-add <package>
rattler-build debug host-add <package>

# 3. Edit source files in work directory to fix the issue
#    (just edit it with your text editor)

# 4. Re-run the build script (fast — no dependency resolution)
rattler-build debug run

# 5. Once fixed, generate a patch for your recipe
rattler-build create-patch

# 6. Update recipe.yaml with the new patch and requirements
# Then run the build again to verify
rattler-build build
Again, we wanted to make sure that this works well for both humans and machines. Machines don't work well with this workflow, so we added an API that works for example for AI agents:
# 1. Set up the debug environment (slow, only once)
rattler-build debug setup --recipe recipe.yaml

# 2. Get the work directory
rattler-build debug workdir

# 3. Edit source files in work directory to fix the issue
#    (agent edits files directly)

# 4. Re-run the build script (fast — no dependency resolution)
rattler-build debug run
# Or whatever script you like
./build_script.sh

# 5. Once it works, create a patch
rattler-build debug create-patch

# 6. Update recipe.yaml with the new patch and requirements
# Then run the build again to verify
rattler-build build
Find out more in our docs for the CLI and the Python bindings.
Staging Output
If you build multiple packages with one recipe (also called a multi-output recipe), these packages are often related to each other. You can imagine for example a C++ project that produces a binary and a shared library that should each live in their own package. What you don't want in that case, is to build both of them from scratch. Our first approach was to introduce this key:
recipe:
  name: foo
  version: 1.0.0

cache:
  requirements:
    build:
      - ${{ compiler('c') }}
  build:
    script:
      - make install

outputs:
  - package:
      name: foo-lib
  - package:
      name: foo-dev
There are a couple of problems with that approach:
Only one cache per recipe: Complex recipes that needed separate build stages had to work around this constraint.
Implicit inheritance: Every package output automatically received the cached files.
Confusing naming: The word "cache" conflicted with compilation caches like
sccache/ccache.
So we went for a different approach: staging outputs! The problem is that even though all of that is still experimental, people already started relying on it. Therefore, we added a migration subcommand. Running rattler-build migrate-recipe yields this recipe:
recipe:
  name: foo
  version: 1.0.0

outputs:
  - staging:
      name: foo-build
    build:
      script:
      - make install
    requirements:
      build:
      - ${{ compiler('c') }}

  - package:
      name: foo-lib
    inherit: foo-build

  - package:
      name: foo-dev
    inherit: foo-build
Let's see what's different here. As the name suggests, a staging output is a special kind of output. Instead of resulting in a package, it serves as a base other packages can inherit from. While we are not doing it in this example, you can also be selective which run_exports you want to inherit. We are now feeling confident with this approach, which is why standardize this via this Conda Enhancement Proposal. Until that one is accepted you still have to opt in to this feature like this: rattler-build build --experimental.
Sigstore Support
We want to make the conda ecosystem more supply-chain security aware. For that, we (experimentally) use our sigstore-rust library to validate attestations in the source section of recipe.yaml files. For example, if a given package is published to PyPI with a sigstore attestation, you can use the following:
source:
  url: https://pypi.io/packages/source/f/flask/flask-${{ version }}.tar.gz
  sha256: 284c7b8f2f58cb737f0cf1c30fd7eaf0ccfcde196099d24ecede3fc2005aa59e
  attestation:
    publishers:
      - github:pallets/flask
For PyPI, this will download the attestations from the /attest endpoint and validate it against the GitHub workflow that should have published the package using the SHA hash. Should someone else have published the flask package on PyPI, you would immediately notice now. We are currently working on enabling the same support for GitHub immutable releases (they automatically get an attestation) and other sigstore ecosystem members to secure the source section. Like staging output, this sigstore support is still experimental. Don't forget to invoke rattler-build like this to use this feature rattler-build build --experimental.
Conclusion
Thank you to Anaconda for sponsoring this work. Specifically, Dan Yeaw for leading this effort and Jakov Smolić for integrating the Python bindings in conda-build. We are also grateful to Axel Obermeier for his input in design discussions. The following people stood out when it comes adopting the recipe v1 format early on and converting many feedstocks to it:
If you like what you read here, we encourage you to give the latest release of Rattler-Build a try. In case you struggle to migrate your recipe to work with the latest release, feel free join our Discord or open issues on GitHub.